How to Take Control of Color Space in Babylon.js
The topic of color space can initially seem intimidating because it is very broad and represents many different approaches to organizing color both in analog and digital representations. Boiled down to a very simple definition, color spaces — along with a mapping function— are used to describe how colors will appear in a medium based upon a specific and agreed-upon standard.
There are many different color spaces that are defined across multiple mediums. The benefit of these definitions is that they make it easy to define methods to transfer color values from one color space to another using what’s called a color transfer function or color mapping. For example, we may set a CMYK or Pantone color space on an image editor so our monitor will display colors as if they were printed from an offset press. Or we may use a Rec 709 color space in our video editing software so the monitor will display color as defined for HD Video and broadcast television while color grading. In each of these cases, we are able to see how color will perform in a different medium from how we are currently viewing the color. This ends up saving time, money, and effort when choosing color values as we have a close approximation of what the final color will look like.
When it comes to rendering graphics to a monitor or device, there are a couple of factors at play which define the color space used. Most devices support and default to an sRGB color space, which has a fairly narrow gamut and is similar to the Rec 709 color space. It is widely used to obtain color consistency across computer monitors, printers, and cameras and is well suited for applications such as viewing images on the web, digital photography, or as a default setting for software applications and hardware devices. But the driving factor for how the sRGB color space is defined has to do with the physiological characteristics of the human eye and how it perceives light and color.
Simply put, the human eye is much more adept at distinguishing the differences between darker values than lighter values. The eye detects light through its photoreceptors — called rods and cones — which each have a unique function. Rods are highly sensitive to light and help us discern values in low lighting conditions. Cones have a low sensitivity to light levels and instead are responsible for perceiving color. A typical retina will have 120 million rods and 6 million cones, which is what gives us our ability to better distinguish between values than color when there is little light.
Luminance and how we perceive color value
When looking at a computer monitor, each pixel is emitting a specific amount of light from which our eyes perceive color and value. The image below illustrates starting with a value of black, or 0% light luminance and increases luminance by 5% with each step until we reach white or 100% light luminance.

What we can note about the gradient is that if we look at the middle step, the pixels rendering value have a luminance level that is 50% of the luminance value of the pixels rendering white. Numerically, this value is 50%, but we perceive the value to be brighter than middle grey. We also have more trouble distinguishing the change in values in the brighter areas of the gradient and we perceive most of these values to be brighter than they should appear.
This is due to our eyes being more sensitive toward low levels of light than high levels of light. This means that for us to perceive a smooth gradient where middle grey looks to us to be midway between black and white, we can’t use a linear interpolation of light power for each step in the gradient. This is where gamma correction comes in. The sRGB color space that your monitor or devices is using relies on a specific gamma curve to adjust the power of light emitting from each pixel to make our eyes perceive a smooth gradient with each segment feeling like the value it is supposed to represent. The image below illustrates how the gradient is modified by the sRGB color space, and a perceived 50% grey pixel will emit only about 22% of the power of a perceived white pixel. This lines up with the sensitivity of the average human eye and brings the perceived values in line with our expectations.

The gamma curve used by the sRGB color space is very close to the standard gamma of 2.2 with some extra adjustment for very dark values. Since it is so similar, however, we will be using the values for standard gamma for the rest of this article as the math is a little simpler and when we are speaking about shaders the extra optimization can really help. When color is displayed to a monitor it uses a gamma decoding color transfer function of function pow(x, 2.2) which results in the gradient above.
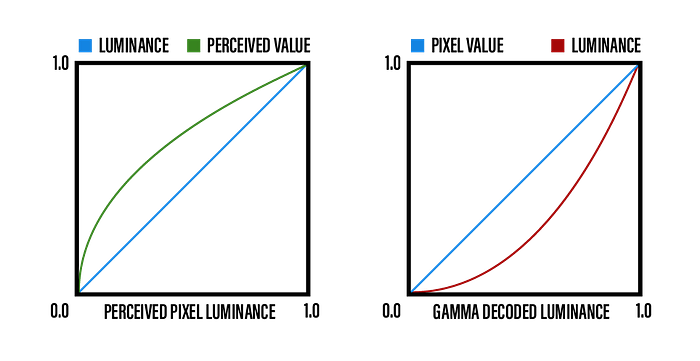
Below are two graphs illustrating what is happening in the two gradients above and why the standard gamma 2.2 is used to compensate for the human eye. On the left, we see the blue line representing the first gradient where luminance value is linearly interpolated from a normalized value of 0.0 to 1.0. The green line represents the values that our eyes perceive based on the physiology of our photoreceptors. On the right the blue line represents the pixel values of the gradient that are fed to the monitor which are a linear interpolation of the gradient from values of 0.0 to 1.0. The gamma decoding done by the monitor runs each value through the color transfer function pow(x,2.2) and returns the luminance value shown by the red line. This decoding of the pixel values aligns with our ability to perceive luminance levels and we then see a linear interpolation of perceived values, even though the luminance level of pixels on the monitor are not linear.
Gamma encoding
We have seen how our perception of light is not linear as the luminance of that light increases. However, when a camera is used to record an image, the light sensors work in a linear fashion. If the light hitting the sensor is doubled, the value recorded is doubled. But remember the graph above on how we perceive luminance shows that doubling the luminance makes our eyes perceive more than double the value. This means that when we record an image with a camera, there are several ways to write the data to a file.
If the image is saved in a RAW format, it means there is no defined color space, and the values are recorded just as the sensor detected. However, if the image is saved in any other format the data will be written in the color space defined by the format. In the case of a .jpg file, the values written to the file will be gamma encoded values, not linear values. The reason for using a gamma encoding color transfer function — pow(x, 1/2.2) — on the luminance values recorded by the camera sensor is to match what we perceived with our vision.
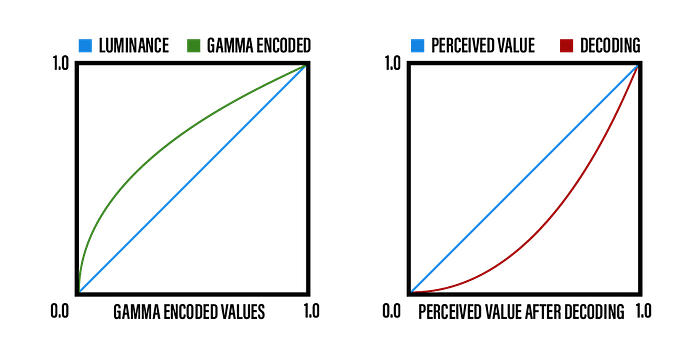
Consider the graphs below. In the left graph, the blue line represents the linear values of luminance recorded by the camera where the green line represents the values written to file. Note how it matches the graph above showing how we perceive luminance based on a linear interpolation of luminance. In the right graph the red line represents the values read from the recorded image after being gamma decoded — pow(x, 2.2) — when displayed to a monitor or device. The blue line represents how our eyes perceive a linear gradient of values, even though the luminance of the pixels in the monitor do not use a linear increase of luminance. Again, note that this graph matches the graph above showing how the pixel values comprising the gradient have their luminance adjusted when displayed on a monitor.
Now we can see how gamma encoding luminance values from a camera’s sensor will retain an image as our eyes perceived it, but this same process is used when saving an image from software. Because the monitor is gamma decoding any color it displays, any choices made about how the color appears in terms of value, exposure, black point, etc. will be based on the value that the monitor displays, not the linear values of that color. For example, if we have a linear value of 0.5 loaded from a file, the value that would be displayed on the monitor would be pow(0.5, 2.2) or approximately 0.2176. But we don’t want to save the value of 0.2176 into a file as loading that from file would incur a second gamma decode transfer to pow(0.2176, 2.2) or approximately 0.0349. This means that any image we save will need gamma encoding so that it will load and display as originally intended when taking the gamma decoding the monitor does into account. In the case of the value 0.2176 from earlier, gamma encoding the value with pow(0.2176, 1/2.2) will result in a value of 0.5 written to the file.
Linear values versus gamma values
Since we have defined how our eyes perceive luminance and how we have to adjust luminance values through gamma encoding and decoding, what does that tell us about working with color space in Babylon.js? The shaders used in Babylon.js take a variety of inputs to a material and use them to calculate the final color of a surface. These inputs could be the base color of the surface or how metallic or rough the surface may be. These inputs are used in calculations with data from the scene to determine what surfaces are facing a light source how the color and intensity of that light affects the surface color.
Where this becomes important is to know if the values are linear values or gamma encoded values. Remember, we said earlier that images that are saved to file need to be gamma encoded to ensure that when they are opened again, they will look the same when the monitor gamma decodes them. So if I use a texture for the base color of a material, that texture will likely have gamma encoded values in it. We don’t want to be doing any calculations with gamma encoded values and instead want to decode them into linear values before doing any calculations. To illustrate why this is, consider choosing a value of 0.25 in a color picker and then saving the image to a file. Then we load that file into a shader for some calculations:
Gamma encoded value saved to file
pow(0.25, 1/2.2) = 0.5326
Gamma encoded value loaded into a shader and multiply the value by 2.0
0.5326 * 2.0 = 1.0652
It’s easy to see that if we assigned a value of 0.25 and then multiplied it by 2.0, we would expect a value of 0.5. However, because the value we multiplied was from a gamma encoded file, we end up with a vastly different result of 1.0625. The correct way to handle this is the following:
Gamma encoded value saved to file
pow(0.25, 1/2.2) = 0.5326
Gamma encoded value loaded into shader and decoded to linear value
pow(0.5326, 2.2) = 0.25
Linear value multiplied by 2.0
0.25 * 2.0 = 0.5
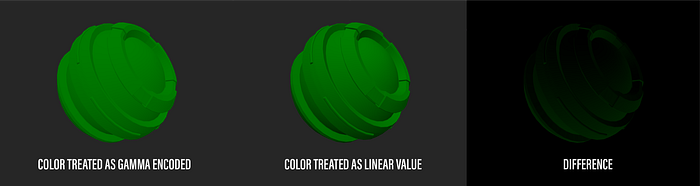
The trick here is knowing when a value is a gamma encoded value or a linear value. The shader does not know whether a value is gamma encoded or not so it is up to us to keep track of this. The example below shows the difference in a render based on if the value for a color is treated as a gamma encoded value or as a linear value. This example is using the color as an input in a simple light calculation. It’s easy to see the difference in the final render based on if we assume a gamma encoded value versus a linear value. This difference becomes critical when we need to match renders to product or brand colors that have specific values.
This means that we will need to have a method to know if a specific value is a gamma encoded value or a linear value. Luckily, there are a few rules we can rely on to give us a good indication about if a value is gamma encoded or not.
Color space and textures
We spoke about material inputs before, and textures are commonly used as inputs for various material properties. Where we create our textures will go a long way to determining if we are dealing with a file that is gamma encoded or not.
For example, if we are using an image editor like Adobe Photoshop, we can assume that files will likely be saved with gamma encoding. This is due to the fact that Photoshop assumes any image saved will be viewed as a color image, likely on a monitor or device. If the image is transferred to another medium, such as printing, there will be a color transfer function which will allow you to move from a gamma encoded file to the color space of the new medium.
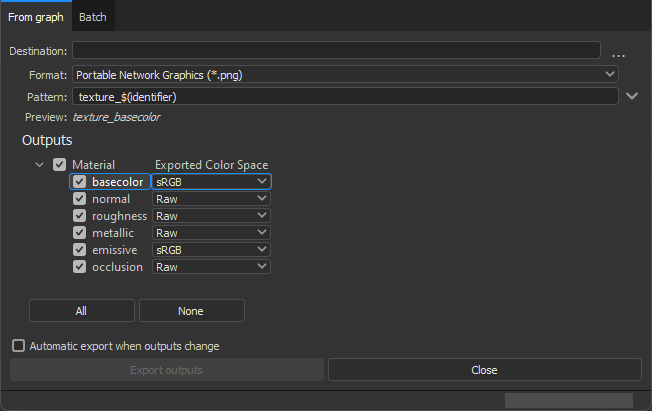
If we are using a texture authoring package like Substance Designer, we have a bit more flexibility to author in the color space you need. In the screen shot below, we see the export settings window for Substance Designer showing several texture channels that can be used as material inputs. Each channel is allowed to be exported in a separate color space depending on how the texture will be used. Typically, the options for color space are sRGB, Raw, and Linear. Exporting a texture in Raw color space means it is using an undefined color space similar to Linear. Exporting as sRGB color space means the color values will be sRGB encoded, which matches the standard color space for monitors and devices.
Remember, we stated earlier that sRGB is very close to standard gamma 2.2, so even if you export your textures in sRGB, you can use the standard gamma 2.2 decode on the texture and you will see minimal change. To optimize the Babylon.js shaders, standard gamma 2.2 is used to encode and decode as the color transfer function has fewer operations making the shaders lighter. There is an option, however, to support sRGB textures if the project has critical color needs.
Now that we see how we can export textures in different color spaces, how do we know which textures should be in which color space? This comes down to how the texture is used. All color data textures should be exported using sRGB color space and all non-color data textures should be exported in linear color space. With that stipulation set, let’s discuss the difference between the two.
Color Data
Color data is considered any texture or color that will contribute to the material color of a surface. This includes inputs like base color/albedo, specular color, or emissive. Examples would be the red of a rubber ball, the blue of a painted metal mailbox, or the orange of a glowing neon sign. The material color is only a part of what is used to describe a surface, but any texture meant to define visible color on a surface should always be exported in sRGB color space.
Non-Color Data
Non-color data is considered any texture or factor that will contribute to the material lighting of a surface. This includes inputs like roughness, metallic, normal, gloss, or ambient occlusion. Examples would be how broad the specular reflections are on the rubber ball, how the paint imperfections of the painted metal mailbox bounce light unevenly, or how rust on the edges of a neon sign blur the reflections of the emitted light. Any texture meant to contribute to how a surface is described that does not directly affect color should be exported in linear color space.
The reason that non-color data should be in linear color space is the data is not meant to be seen directly by the human eye and as such does not need to account for how our eyes perceive values in those textures. For example, a normal texture is a set of vectors stored inside each pixel which contribute to the way light bounces off a surface. If we applied a sRGB encoding to this data, we would be changing each vector to aim in a slightly different direction than authored resulting in an incorrect render. Since this type of texture is not meant to be viewed by the human eye, there is no reason to sRGB encode these textures just to decode them in the shader so we can use them in calculations. Saving them in linear color space is another way to limit calculations to optimize our shaders.
What Babylon.js expects for color space
For the most part we can assume that Babylon.js follows the same rules we’ve already spoken about in terms of specific color spaces for specific textures. However, there are a few places in which some detail is needed to make sure that we are using the materials correctly.
Standard Material
The StandardMaterial class uses a blinn-phong lighting model ingesting specular-glossiness textures. This material makes assumptions that any color data texture, including the specular color texture, will be gamma encoded. Again, Babylon.js will assume gamma encoding for color data textures unless you enable the engine to support sRGB color space to optimize our shaders. All non-color data textures are assumed to be in linear space.
This means that we need to make sure to match the color space for any texture used as an input for the material to the expected color space as the conversions are baked into the shader and cannot be changed. As was stated above, the specular texture falls into the color data category in this model since the specular texture defines the color of specular reflections. The texture may also contain diffuse color for any metallic surfaces as specular reflections of metallic materials contain diffuse color in the reflections.
PBR Materials
We have several choices of PBR materials to use in Babylon.js. The first two, PBRMetallicRoughnessMaterial and PBRSpecularGlossinessMaterial, are basic implementations of the two lighting models for physically based rendering. These both have similar textures inputs except for the textures describing the specular reflections of the material. The metallic-roughness model uses non-color data to identify what is metal and how rough the material is. The specular-glossiness model uses a mix of color and non-color data where specular color data will assume gamma encoding and the glossiness will be in linear color space. In this material, however, we don’t use a separate texture for glossiness and instead put the glossiness texture in the alpha channel of the specular color texture. Gamma encoding is never added to an alpha channel, so we can keep both types of data in the right color space all in one texture, even if the texture was exported with sRGB encoding.
There is also an advanced material called PBRMaterial. This one material can be configured to use either the metallic-roughness model or the specular-glossiness model and it has several more advanced features. The texture inputs for PBRMaterial follow the same rules as the other PBR materials, so there are no special cases here.
One feature that all PBR materials employ is being able to treat any texture as either gamma encoded or linear so they can apply a color transfer function only when needed. The Texture class has a gammaSpace accessor which defines if the texture is gamma encoded or linear. All of our PBR materials will refer to this flag to know if a color transfer function is needed for the texture. This gives us some extra flexibility when it comes to exporting textures as we can export all of our textures either as gamma encoded — as they would be if we create all of our textures in an image editor — or as linear and then use the gammaSpace accessor to let the shader know if any conversions are necessary for any input.
Background Material
The BackgroundMaterial class is a specialty material used for creating a simple environment for product renders. It is a simplified material that is good for a ground plane to catch shadows or show reflections. We can use a diffuse or reflection texture with the material, both falling into the color data category. Background material, however, also respects the gammaSpace accessor on the Texture class so we can use the accessor to control any conversion needed directly in the shader for any input.
Node Material
Since the node material editor allows us to create custom shaders for our assets, we must be a little more careful about color space when using it. Where the other materials expect to do some conversion for us, node materials are custom shaders that we create for a specific use case. The editor relies on us to apply color transfer functions when needed and has no expectations about the color space of any input. There are several parts of the editor that are worth discussing so we can see how they can help us define color space. For the purpose of this discussion, note that the terminology on the nodes to use a specific color transfer function are called Convert to linear space and Convert to gamma space. We will use those terms for the remainder of this section, but they are equatible to gamma decoding — pow(x,2.2) — and gamma encoding — pow(x, 1/2.2) — respectively.
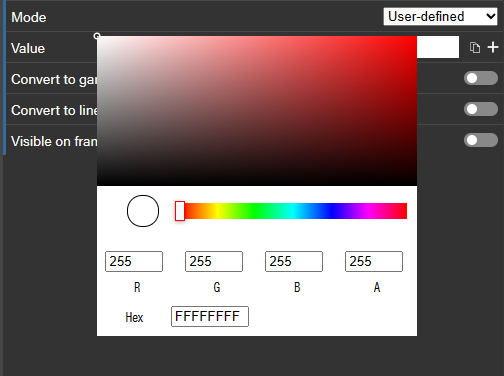
Color Picker
The color picker implemented in the node material editor shows color that has been gamma decoded. We can easily tell by looking at the black to white gradient on the left side of the picker. The gradient appears to be perceptually linear like the examples above, which means that the monitor has gamma decoded the values it is displaying. If we are using the picker to select a color visually, the value we end up with will be gamma encoded. For any color entered directly into the picker from another source, we will need to know the color space for those values to determine if we need to enable a color transfer function on the node.
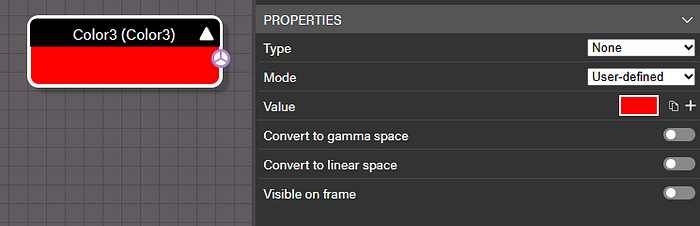
Color3 and Color4 Nodes
Both these nodes will hold a color value as defined by the user. We need to know if the color values are gamma encoded or linear because, as was stated earlier, we should not be doing any calculation with a gamma encoded color. If the color values are linear, we don’t need to do anything else. If the color value is gamma encoded, however, we need to convert it to linear before using it for any calculations. Luckily, we don’t need to manually convert the color as we can simply set the parameter Convert to linear space on the node itself. There is also another parameter to Convert to gamma space in case we have the color values in linear space but need them to instead be in gamma encoded for any reason. The color nodes are a good example of why it’s important to keep track of color space since the node itself does what basis the value of the color is using. It can also get confusing if the source of the color value is unknown or the colors are in mixed color spaces. It is good practice to stick to using gamma encoded colors for color data and linear colors for non-color data, so we always know when a color transfer function is needed.
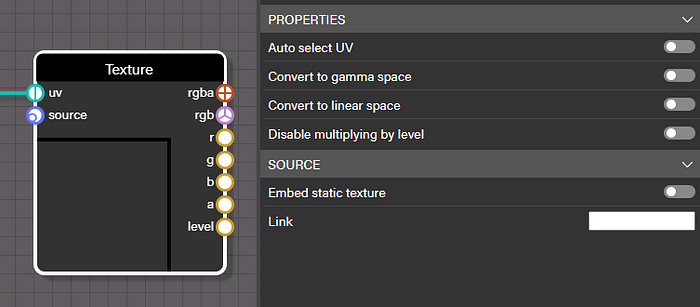
Texture
Any texture loaded into a node material will either be loaded directly into a Texture node or be loaded into an Image Source node and wired to a Texture node. In both cases the color space of the texture can be converted right on the Texture node just like with the Color3 or Color4 nodes. Textures can be more straightforward in terms of knowing if they represent color data or non-color data depending on the how they are used in the shader.
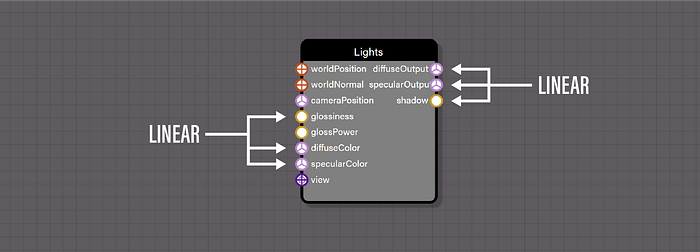
Lights
This node calculates the scene lighting considering all punctual lights in the scene such as directional, spot, and hemisphere. This uses a blinn-phong lighting model and is closely related to StandardMaterial in Babylon.js. This node does not do any specific conversion on any input and expects the user to pass all color inputs as linear. Because we should not be doing any calculation on gamma encoded color values, we should convert any nodes wired to diffuseColor and specularColor to linear color space. The glossiness input should already be in linear space, so there is likely no conversion is needed. The diffuseOutput, specularOutput, and shadow output color space will match what was put into the node. If we set our input correctly to linear space the output will also be in linear space.
PBRMetallicRoughness
This node also does no color space conversion of any input wired to the node. To do the lighting calculation correctly we must set all inputs to be in linear color space, so a conversion needs to be done on any gamma encoded color data. For the outputs, there is one that has already been converted to gamma space which is the lighting output. This is a combination of all lighting components and includes a gamma space conversion for convenience. The rest of the component outputs are all in linear color space so that we can immediately use them for other calculations without needing any conversion. Once we are done combining or modifying the components, we will still be in linear space and fortunately there is an easy way to handle this conversion in the FragmentOutput node.
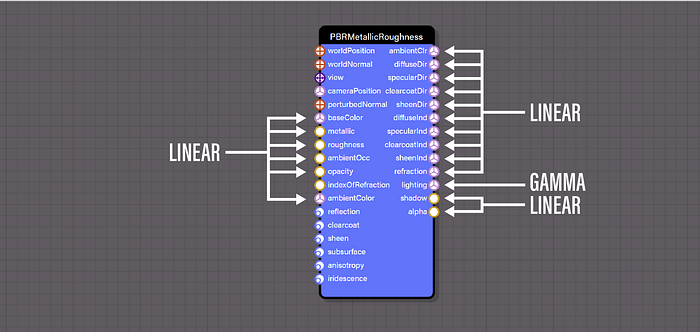
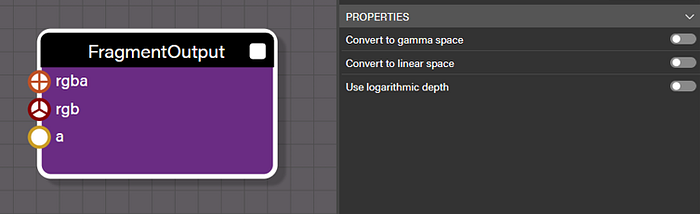
FragmentOutput
Typically, this block will expect any inputs to be wired with color in gamma space. This is why the PBRMetallicRoughness lighting output is already converted to gamma space and can be directly connected to the FragmentOutput. Otherwise, we will likely have color in linear space before we wire it to the FragmentOutput. A manual conversion can be done if desired, but the simplest way is to utilize the Convert to gamma space parameter on the FragmentOutput block. This becomes a powerful way to control our color space so we can simply ensure every input is in linear space and then convert it all back to gamma space right at the end.
Final Thoughts
While the topic of color space is broad and can easily confuse, it can also be broken down to some specific guidelines for ensuring that our materials render correctly. Keeping in mind the difference between color data and non-color data helps define in which color space textures should be exported.
Also, when using node material, being mindful to never do any calculation with a color or texture that is gamma encoded should help keep our node materials rendering correctly. Every node that deals with color in the graph should also have parameters to convert values if needed. Remembering to check our color space as we build our graph can go a long way to prevent unexpected results.
If you want to go more in depth about managing color space in computer graphics, check out this excellent blog post from John Novak.
Patrick Ryan
Senior Technical Artist, Babylon.js