Unlocking the Power of UV Manipulation
Hey there! Over the past couple years, I’ve been on a journey to understand how (and why) a person might want to write a shader. You know, one of those crazy programs that you pass to the GPU to have it do bonkers calculations for you. Along this journey, I’ve discovered a secret weapon that is honestly a game-changer for creating immersive 3D web experiences: manipulating UVs within a shader!
Ok, Ok…I admit that can sound daunting, but it’s actually really straight forward once you understand what’s happening. That’s the goal of this article, to make it SUPER straight forward to understand and setup the UVs of a mesh, and manipulate them with a GPU shader. Sound fun? Let’s dive in!
There’s really no better place to start, then to look at where we’re going.

Head on over to this playground: https://playground.babylonjs.com/#TB4PEA#18
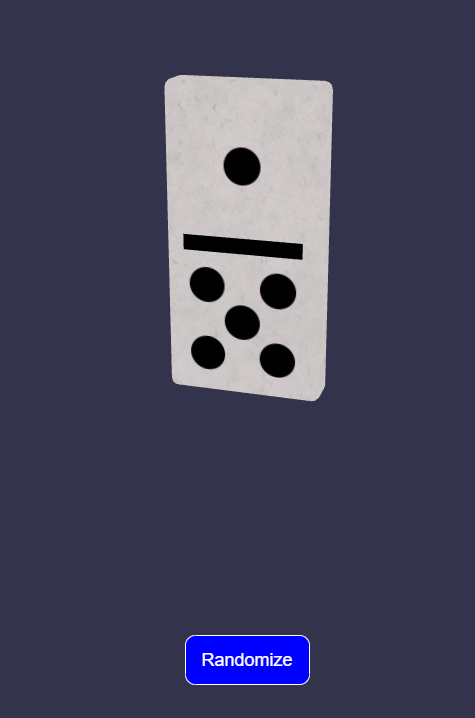
What you’re seeing here is a single mesh with 2 textures.
The Base Color marble texture:

And the texture for the dots.

Go ahead and right click and save both of those images. If you’re going to follow along, then you’re going to need them.
When you hit the randomize button in the playground, you pass a message to a special GPU shader that manipulates the UVs on the dot texture to “reposition” the texture and display a different random number between 1 and 6 on the domino.
First let’s take a look at the mesh itself and how it was created.
If you’d like to follow along, feel free to grab the mesh here and open it up in Blender.
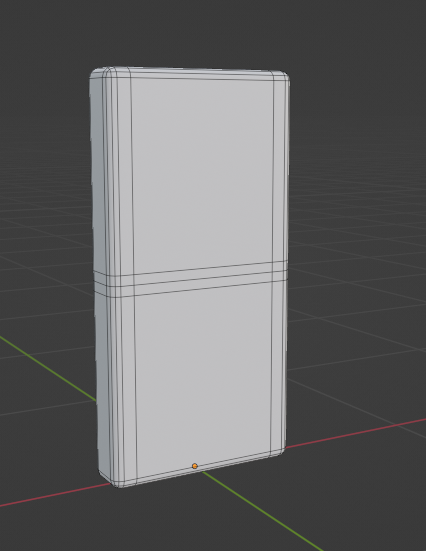
The first major step in our process is to think about the domino and how we want to set it up to work with our shader. The domino really has 4 main parts that we need to consider.
The main marble white color

The black separator line in between the dots:
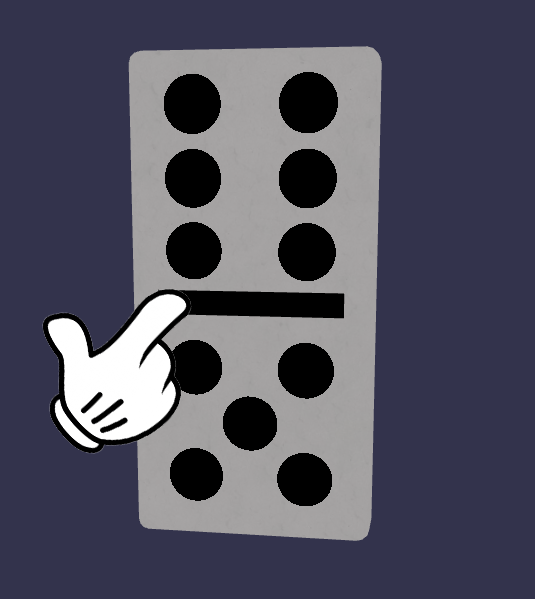
And the 2 dot sections:
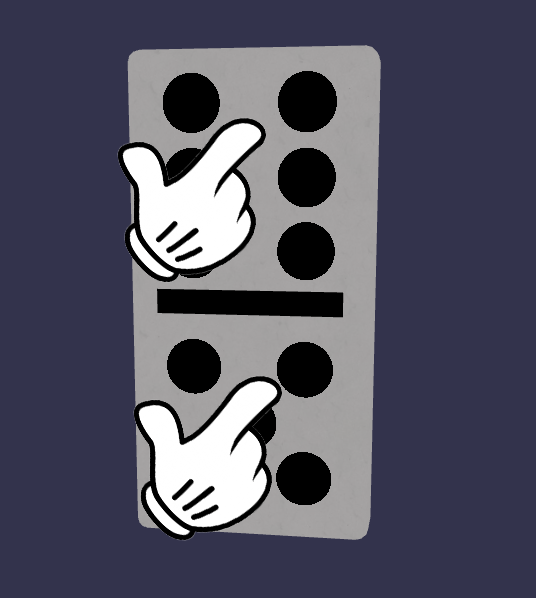
With these 4 sections, there are MANY ways we could approach setting up this mesh to work with the shader, but let’s simplify it one step further.
We’ve got a white marble part, and we’ve got some black parts on top.
With that in mind, let’s talk about how we can lay out the UVs of this mesh.
Right, ok maybe we should take a BRIEF pause for a tiny refresher on UVs.
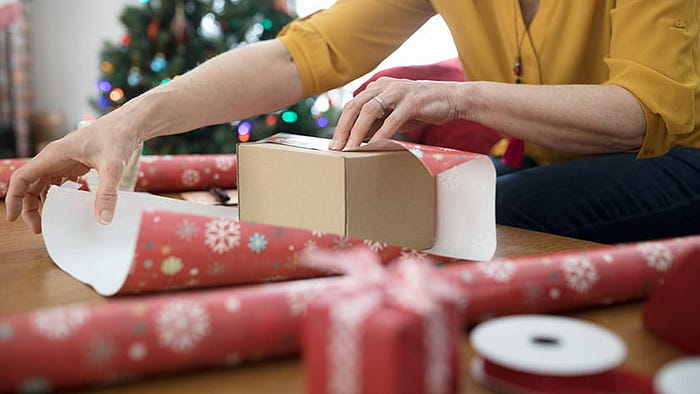
You can think of UVs like wrapping a gift. Except instead of paper wrapped around a box, we’re going to wrap a texture around our domino mesh. Creating UVs (or UV maps) is the process of telling a rendering engine HOW a flat texture should be wrapped around your mesh. You can read more about UV mapping here: https://en.wikipedia.org/wiki/UV_mapping
For this mesh, we’re actually going to create 2 separate UV maps, one for the white marble part, and a second one for the black parts.
We won’t go into extreme detail about how I created each map, but they look like this:
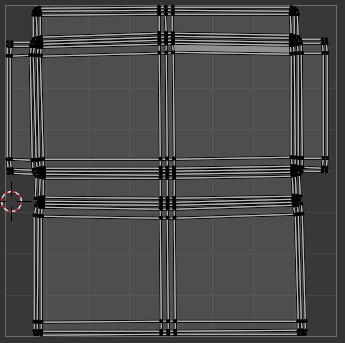
UV Map 1 — White Marble:
UV Map 2 — Black Parts Separated

There’s really not anything special about UV map 1. It simply lays out the entire mesh over the face of the the full texture space, so that the marble texture will wrap all the way around the domino. You can think about it looking like this:
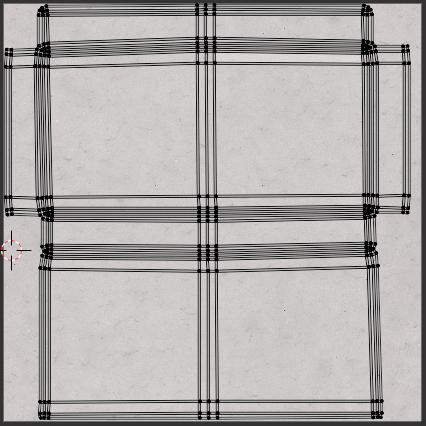
UV Map 2 however…that’s something very special that we need to discuss!
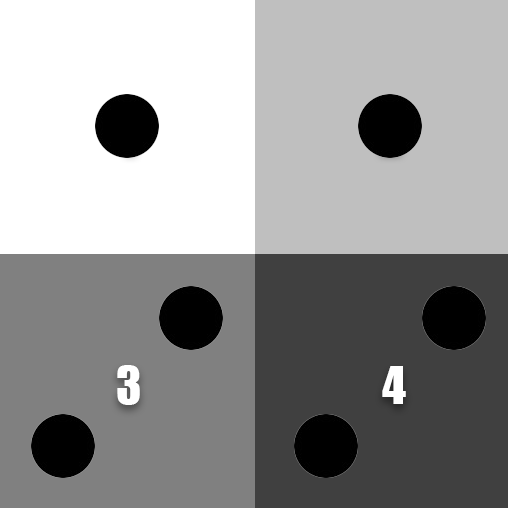
Let’s start by thinking about a square texture broken into 4 unique pieces:
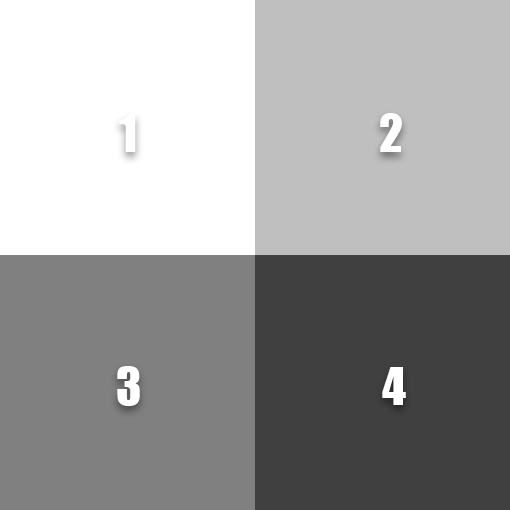
With UV map 2, we’re going to assign each of the 4 different parts of the domino to a unique section of this texture space.
Part 1 — The white marble part
Part 2 — The black line
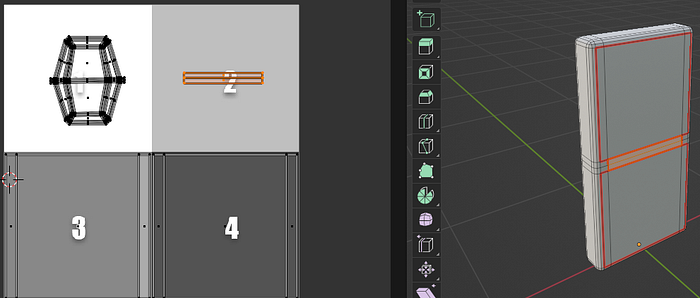
Part 3 — The upper number

Part 4 — The lower number
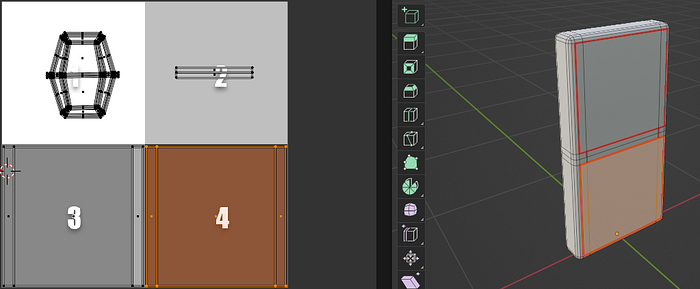
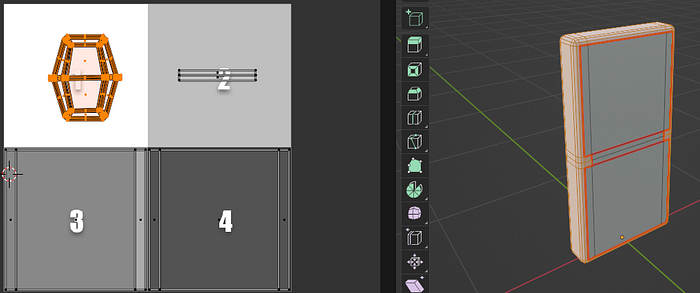
For UV Map 2, we don’t care about the white marble part since this color will already be assigned through UV Map 1 in the shader. The only thing that matters is that the entire bounds of the white marble part are contained within section 1 of the texture space. The upper left quadrant.
We DO care about section 2, the black line, and sections 3 and 4, but we’ll get into those once we dive into the shader itself.
Oh hey! Guess what time it is? Time to dive into creating the shader!
Let’s head over to the Babylon.js Node Material Editor: https://nme.babylonjs.com/
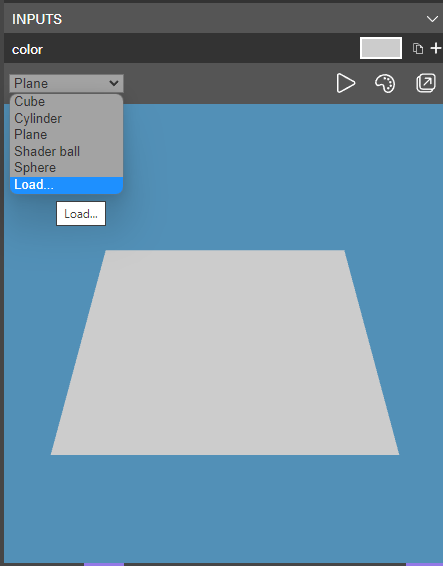
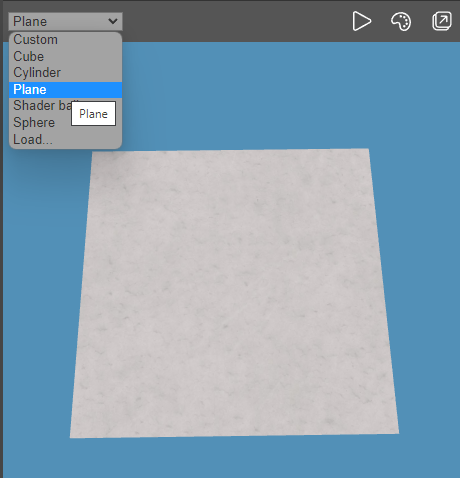
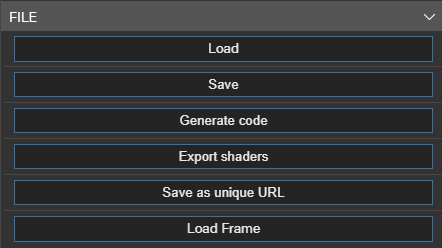
Before we do anything, head down to the preview window and open up the drop down menu and click on ‘Load’ so we can load the domino mesh into the preview window.
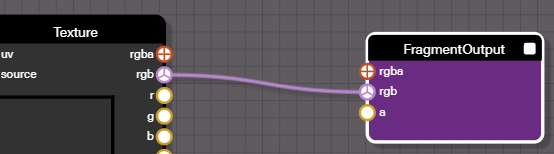
Let’s start with the easiest part, UV map 1 and the marble texture. For this article, we’re only going to be working with the FragmentOutput part of the shader.
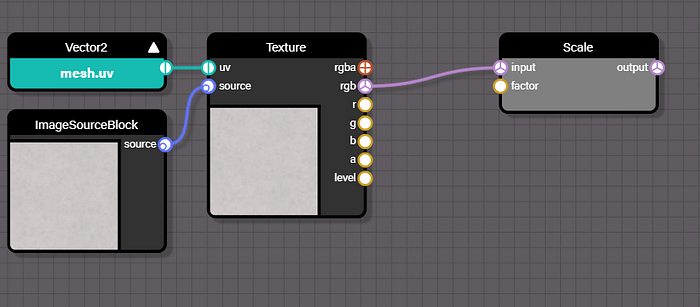
Bring in a Texture node and connect its rgb output to the rgb input of the FragmentOutput node.
Next drag in an ImageSourceBlock and connect its source output to the source input of the Texture block.
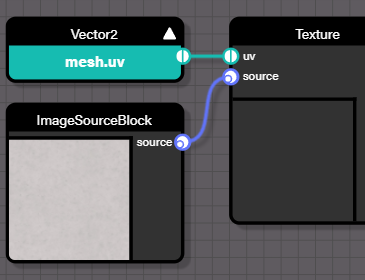
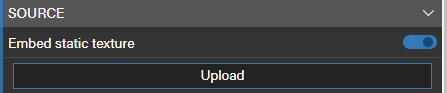
With the ImageSourceBlock selected, upload the marble texture (from earlier in this article) to that node.
Lastly, you can delete the color 4 node. We don’t need it anymore. Your shader should now look like this:
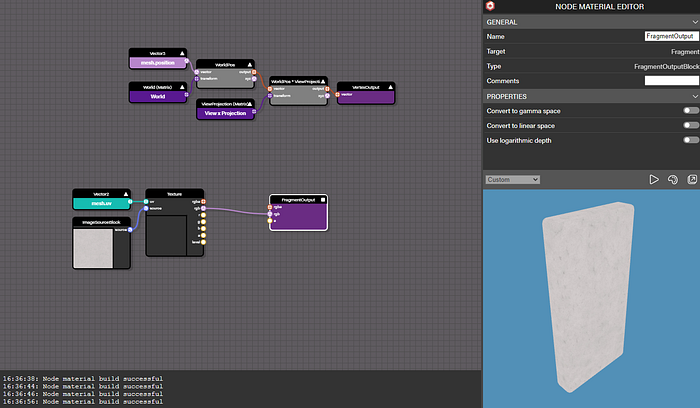
Congrats! You just wrote the first part of our shader! Yay!!!!
Before we go any further, let’s take a look at that green mesh.uv Vector 2 node! Select it and look at its properties.
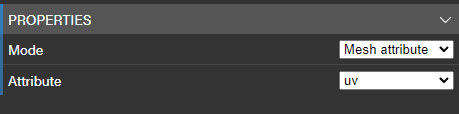
See that ‘Attribute’ property? That’s where we get to tell the shader which UV map to use. In this part of the shader, we’re using UV map 1 (uv in the Attribute pull down menu). If you’ll recall, UV Map 1 looks like this:
So in the most simple terms, what we’ve done with our shader is essentially recreate this exact picture that you’re seeing above. We’ve loaded the marble texture, and with UV map 1 loaded, we wrap that texture around the domino. Pretty cool right?
Ok now is where we roll up our sleeves and shift into a new gear of fun!
Before we dive into the number dots and the black line, we first have to create a mask for the 4 sections of our UV Map 2 quad layout. Remember this guy:
To do this, let’s make it easy on ourselves by temporarily changing our preview mesh to a plane to better visualize things. You may notice that there is a plane available in the Preview Window. While this is nice, for the purposes of this article, we’re going to use this plane instead: https://piratejc.github.io/assets/plane.glb. I won’t bore you with the detailed reasons why this plane will be easier to work with, but just know that it was created in Blender and helps us work in the same UV space as our domino.
Now that we’ve loaded our custom plane, let’s grab a VectorSplitter node and hook it up to our mesh.uv Vector 2 node like this:

This allows us to have individual control over the x and y values of the uv layout of the mesh. Don’t worry if that doesn’t make sense yet, it will.
Go ahead and hook up the x output of the VectorSplitter node to the rgb input of the FragementOutput node.

This image is telling us a lot! UV space goes from 0 to 1. By hooking the x channel into the fragment output, we can clearly see that x is zero on the left side of the mesh and it’s 1 on the right side of the mesh!
Try hooking up the y channel and see what it does.
This is where we’re going to tap into some real magic and have some fun!
Let’s start by separating UV space into 2 pieces, a left piece and a right piece.
Bring in a GreaterThan node and hook up the x output of the Vector Splitter into the ‘a’ input of the GreaterThan node.
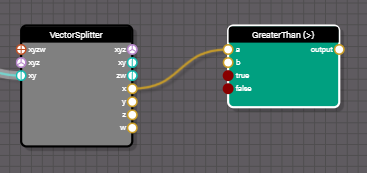
Next, bring in a float node and hook it up to the ‘b’ input of the GreaterThan node. Set the value of the float to 0.5 and hookup the output of the GreaterThan node to the rgb input of the Fragment Output node.

HOW COOL IS THAT!!!! Seriously! That’s magic! Do you know what we just did there? We just used basic math to manipulate uv space…the left half of our mesh is now black, and the right half is white! Why is this cool? Because we just created a MASK!
Let’s try something out real quick. Bring in a Scale node and hook up the rgb output of the texture node into the input part of the scale node. Next hook up the output of the GreaterThan node into the ‘factor’ input of the Scale node. Finally, hook up the output of the Scale node into the rgb input of the FragmentOutput node.
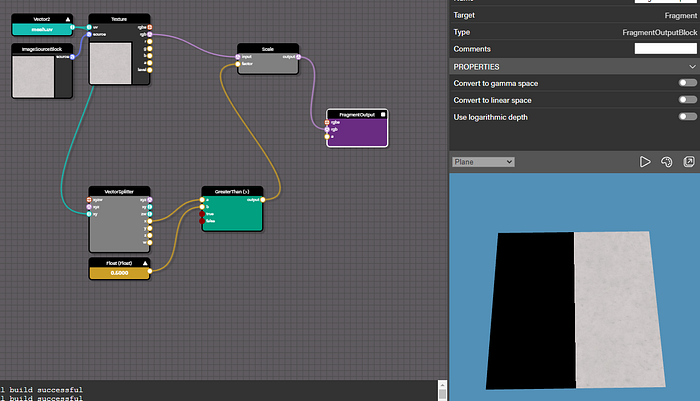
That’s STRAIGHT UP WIZARD MAGIC!!!! We used the Mask that we created to tell the shader we only want to display the original texture on the right half of our mesh! Think about that for a moment! We used the UV space and basic math to create a mask, then we applied the texture onto the mesh THROUGH that mask! That’s SOOOO cool!!!
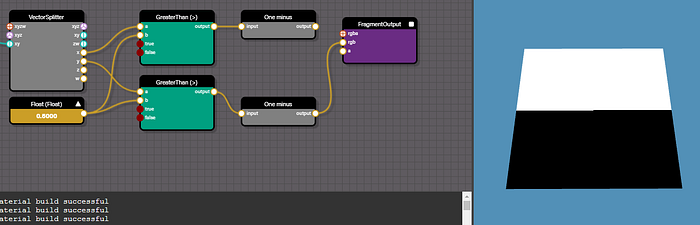
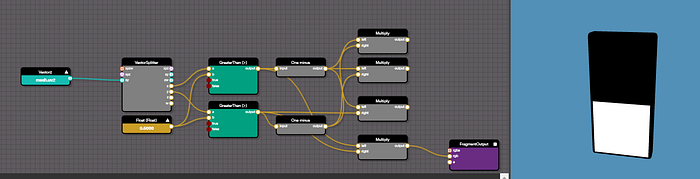
Ok let’s go a little faster for this next part. Go ahead and remove the scale node and add a OneMinus node between the GreaterThan Node and the Fragment Output:
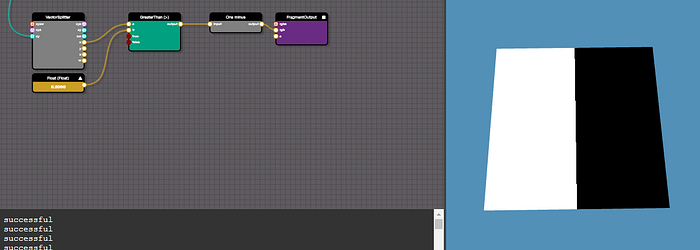
The One minus takes the original value of the mask and essentially flips it. 1–0 = 1 and 1–1=0…or rewritten a different way: white-black = white and white-white=black.
So in our shader, we now have individual masks for the left and right sides of our UV space! Fantastic! Let’s do the exact same thing for the upper and lower sections.
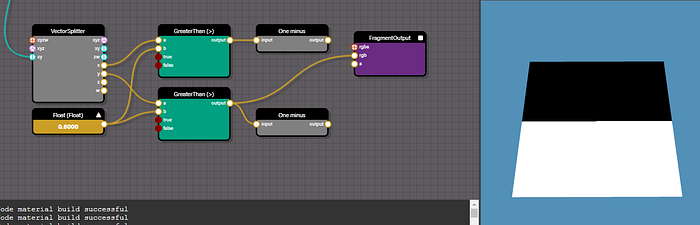
We can do this super easily by copying and pasting the GreaterThan and OneMinus nodes. However instead of using the ‘x’ value as the input into the pasted GreatherThan node, we’re going to use the ‘y’ value instead. BAM!
Upper section:
Lower section:
But we want access to masks of 4 different sections of a square. Do you know what comes next? Simple multiplication!
Bring in a Multiply node and hook up the output of the OneMinus node in the ‘x’ section of our shader to the left input of the Multiply Node. Next take the output of the OneMinus node in the ‘y’ section of our shader and hook it into the right input of the Multiply node. Finally, hook the output of the multiplication node into the FragmentOutput.
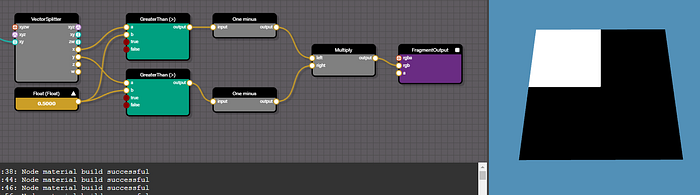
THAT is simply awesome! Take a moment to think about how that works. We’re taking the left half of the mesh (uv space) and multiplying it against the upper part of the mesh (uv space) and displaying the result. The white section is where 1x1=1. Everything else falls to zero or black! So we now have a mask for isolating the upper left quadrant of our mesh! I’ll bet you can figure out the rest by adding a few more Multiply nodes!
Upper right quadrant:

Lower left quadrant:

Lower right quadrant:
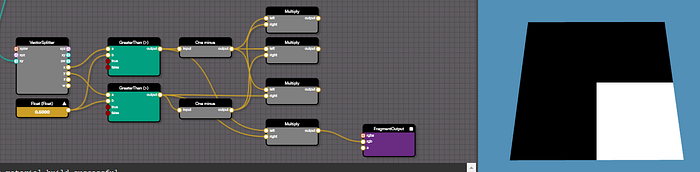
Pretty slick right??? With just a few basic math operations, we have access to the 4 different quadrants of UV space!
Ok, let’s hook this up to our domino! First, reload the domino via the ‘load’ option in the drop down menu of the preview window. Next, bring in a new UV node and select ‘uv2’ from the Attribute dropdown list. Hook that new UV node into the xy input of the Vector Splitter.
Your graph should now look something like this:
Go ahead and try hooking up the various outputs of the multiplication nodes into the fragment output.
How cool is that!!! We now have masks that perfectly match the 4 areas of our Domino!
Ok it’s time to bring in our dots! To make this easy, let’s go back to using our custom Blender plane in the preview window. Reload it through the ‘Load’ option in the preview window. Don’t forget, that our plane only has 1 UV map which means we need to hook it back up to our other uv node like this:

Ok great, now let’s bring in a texture node, a vector splitter node, a vector merger node, and an ImageSourceBlock node and hook them up like this:

Notice how the UV1 node is being passed into our new Vector Splitter? Next load the dots texture (from earlier in this article) into the ImageSourceBlock, and hook up the rgb of the Texture output into the FragmentOutput like this:
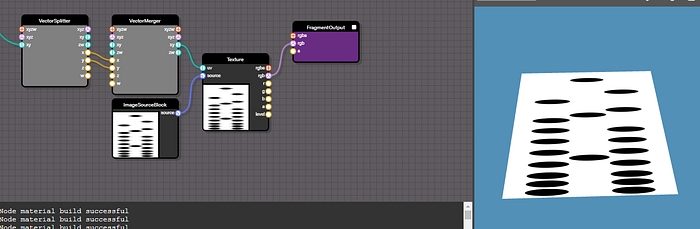
At this point you can probably easily spot a problem. The image looks weird, it’s squashed! This is due to the fact that our dots texture is 6 times taller than it is wide, and we’re trying to map that entire texture to the plane. So you can think of it as being stretched out 6 times wider than it should be to map to a square.
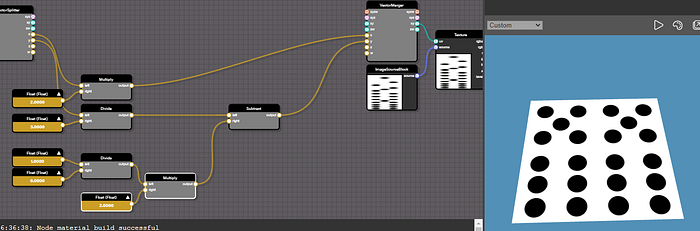
Let’s use our newly discovered super weapon of manipulating UV space to make this better! Let’s remap the x value of UV space by multiplying it by 6. Bring out a Multiply node and a Float node. Set the float value to 6 and hook it up to the x value between the Vector Splitter and Vector Merger nodes. This section of your shader should now look something like this:
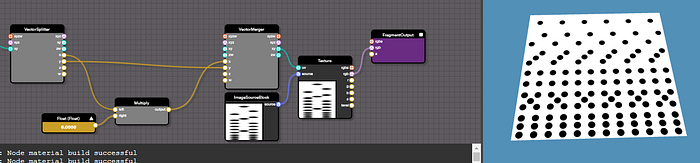
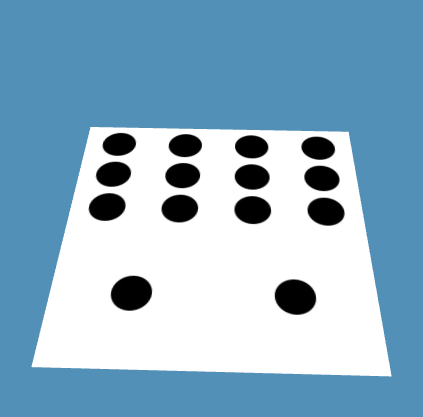
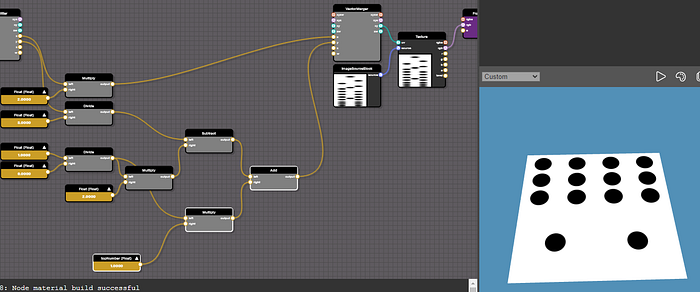
Ok! Now we’ve got the correct aspect ratio, but it’s repeating 6 times. We actually want it to repeat 2 times to match up with our 4 quadrant masks. Instead of multiplying the ‘x’ value by 6, let’s change that float value to 2. We’re also going to bring out a divide node and another float so that we can divide the ‘y’ value by 3. It should now look like this:
That’s AWESOME! Can you see what’s happening? We just lined up our dots PERFECTLY with the 4 different quadrants of our UV space! Here’s a helpful image to ground everything together:
If you’re not geeking out right now, then take a long look in the mirror and rediscover JOY!!!!!!
Let’s mentally overlay the Domino UV2 set over this to see what it might look like:
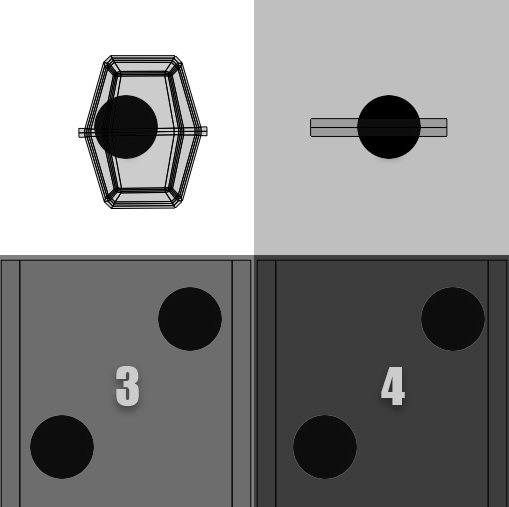
The top face of our domino is mapped to quadrant 3 which now displays the 2 dot pattern. And the bottom face of the domino is mapped to quadrant 4 and is also displaying a 2 dot pattern.
Our next step is to be able to ‘move’ the texture to display a number of our choice in each quadrant. We’ll continue to use our Super Weapon for this…manipulating UV space with math!
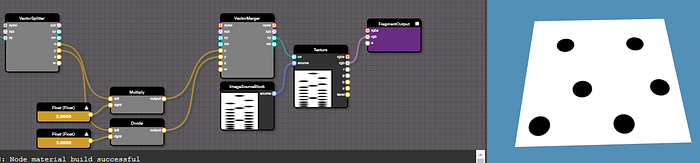
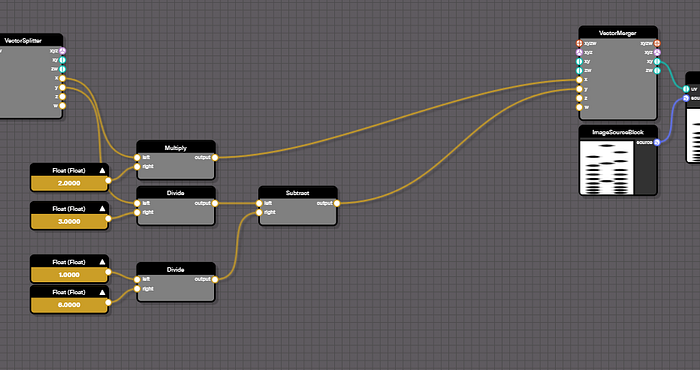
To do this we’re going to creating a sequence of addition and subtraction from the ‘y’ value. We’re going to start by making sure we can see the number ‘1’ in quadrants 3 and 4. We want to subtract 1 full “number’s space worth” of the texture. Since our dot texture is 1 unit wide in ‘x’ relative to the 6 units tall in ‘y,’ We can subtract 1/6th of the texture’s height. Bring out 2 Float nodes, 1 Divide node, and a Subtract node. Set the values of the Floats to 1 and 6 and hook them into our ‘y’ calculation like this:
SWEET!!!! Now the number 1 is displayed in quadrants 3 and 4!
Ok I lied to you. I’m a horrible person! We actually want to offset it by 1 more 1/6 length so that the number 6 is displayed in quadrants 3 and 4. You’ll see why in a minute. Bring in another Multiply and Float node. Set the Float value to 2 and hook it up like this:
We want our shader to randomly display any number between 1–6 in quadrants 3 and 4. So that means we can now instruct our shader to ADD the unit length of 1/6 by ’n’ number of times. If we offset it by 1/6, it will display 1 dot, 2/6 and it will display 2 dots, etc. Bring out a Multiply node, an Add node, and a Float node. Set the Float value to 1 and hook them up into our ‘y’ value calculation like this:
Let’s rename that new Float node we just added to: “topNumber.” Try typing in different numbers between 1 and 6 into the “topNumber” node. This single Float value is going to be one of two different interactive parts of our shader. Remember the gif at the top of this page? When we hit the randomize button in our scene, we’ll set the value of this float to a random number between 1 and 6.
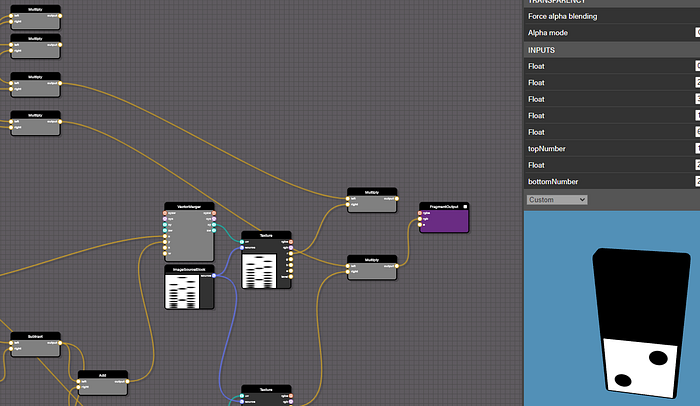
Sweet! So we’ve got our input value for the top number of the domino. Now we need one for the bottom number. We’re going to copy/paste all 5 of the highlighted (white boarder) nodes in this image:

This portion of our shader should now look like this:
Let’s rename that float at the very bottom of the image to “bottomNumber” and change its value to 2.
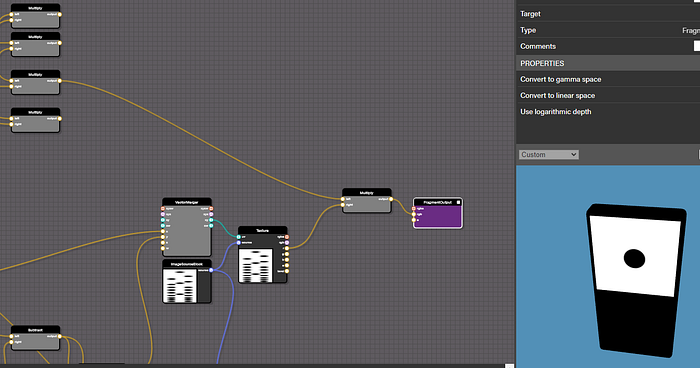
With our Fragment Output connected to the top Texture node, it’s being influenced by the “topNumber” Float. We can see that 1 is being displayed in both quadrants 3 and 4.
Try connecting the FragmentOutput to the other texture node.
YES!!!! We now have a separate parts of our shader dedicated to the top and bottom number!
Wow, we’ve covered a lot of ground!
Are you ready for the final sprint to the finish line? Let’s connect everything together!
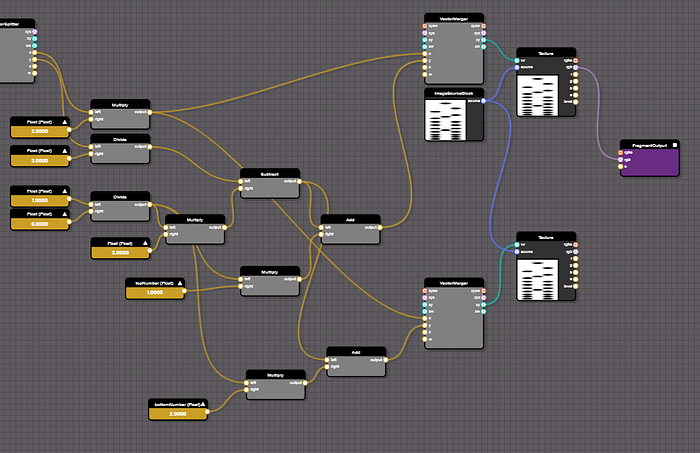
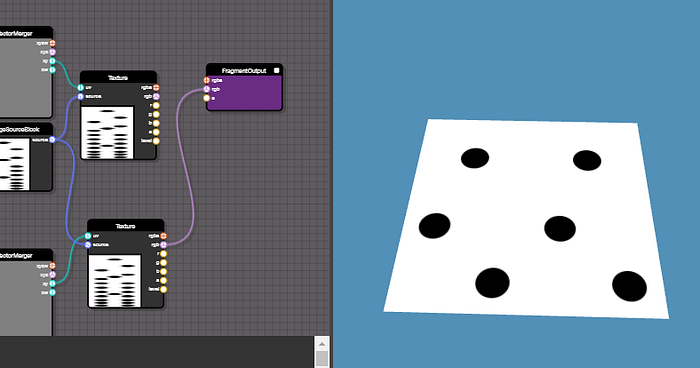
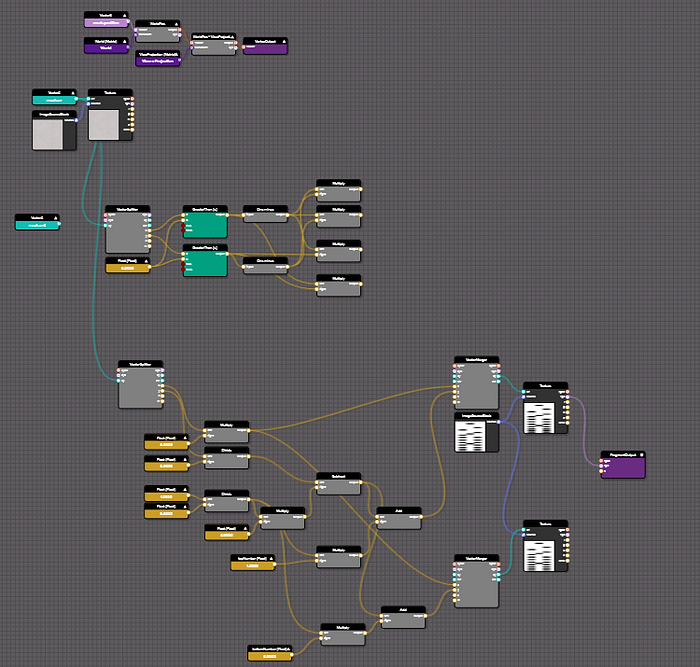
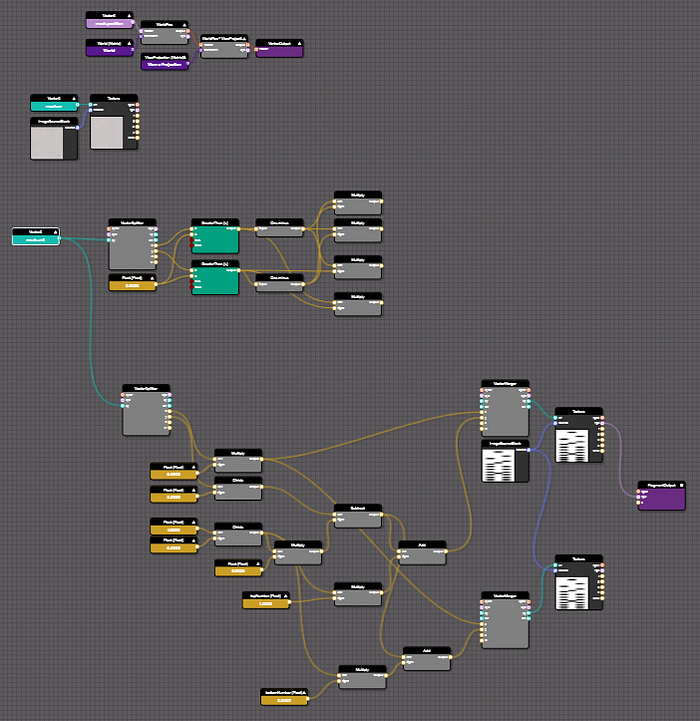
Let’s take a high level look at our shader:
Let’s start by hooking up our green uv2 node into the mask section of our shader AND the number shifting section like this:
And let’s reload the domino into our preview window.
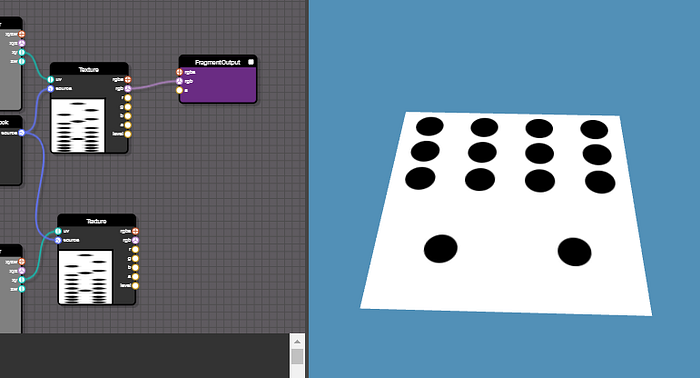
Continuing to focus on the number shifting section of our shader, you should now see something like this:

WOOHOO!!! our numbers are now displayed perfectly! With our Fragment Output connected to the top texture node, if we change the value of the topNumber Float, we see that number displayed on both domino faces. Switch the Fragment Output to the bottom texture and it’ll display whatever number the bottomNumber Float is set to!
This is AWESOME! Believe it or not, we’re done with 95% of our shader! We unsheathed the secret weapon of UV space manipulation to create quadrant masks AND line up the numbers on a texture to those quadrants!
Let’s cross the finish line shall we? Let’s apply our quadrant masks to the top and bottom sections to display the appropriate numbers to each face.
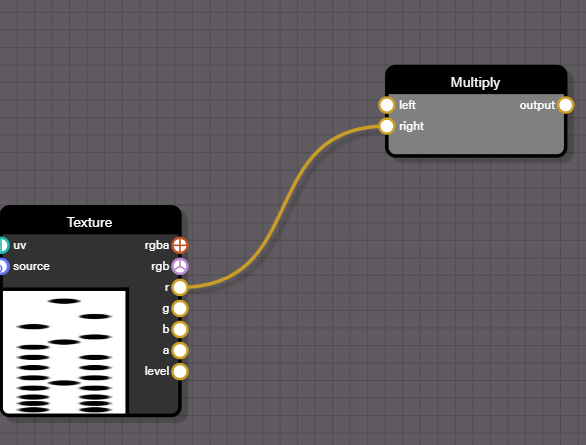
Grab a Multiply node and connect the ‘r’ output of our top number texture into the right input of the Multiply node.
Then hook the lower left quadrant mask into the left input of the Multiply node and hookup the multiply into the FragmentOutput node.
Let’s do the same thing for the bottom texture and lower right quadrant mask.
What do you think would happen if we add those 2 together?
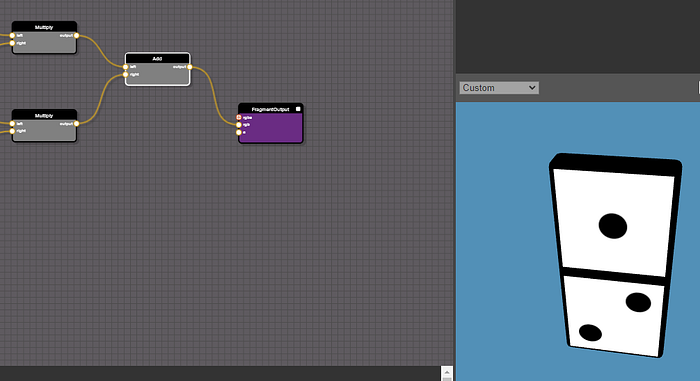
WOOHOO!!!!! How Cool is that!!!! Now if you change the values of the topNumber and bottomNumber floats you see the changes reflected appropriately per domino face! That’s so awesome!
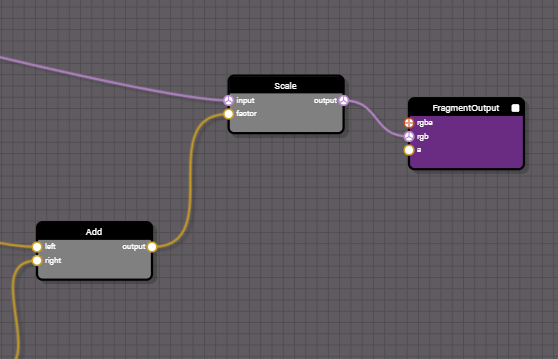
Now let’s bring in another Add node and add this result to the upper left quadrant mask:
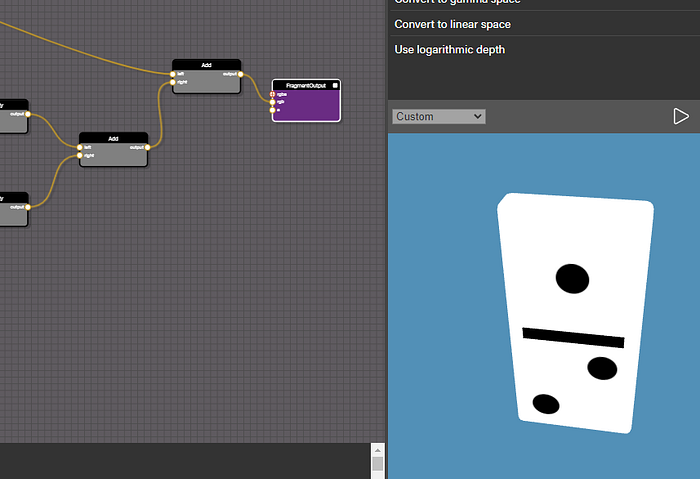
One last thing to do and we’ve got a full domino shader ready to go!
Bring in a Scale node and hook it up to the original marble texture rgb output and the output of our most recent Add node. Then pass that output to the FragmentOuput.

YEESSSSSSSS!!!!
Save your work to the Babylon.js Snippet Server by clicking on the canvas and pressing the “Save as unique URL” button.
That will save your work to a specific URL like this: https://nme.babylonjs.com/#J4XAC0
Now hop over to our starting playground: https://playground.babylonjs.com/#TB4PEA#18 and look for this line:

Replace the bit in quotes with the unique hash for your saved shader:

And Run the scene!
Congratulations! Wow! You just created a shader that manipulates UV space to randomize the dots on a domino in a mesh! HOW COOL IS THAT!!!!!???
Take your time and go through the playground code to see what’s happening. The mesh and node material (shader) are loaded, we set the mesh’s material to be our shader, and we randomly assign a number between 1 and 6 to both the top and bottom Floats in our shader!
What an adventure! I sincerely hope this article was helpful and you now have a new super power that you can take with you on your journey to creating more immersive 3D web experiences!